Installing a Self-Hosted Runner
OS
The runner setup is currently supported and tested on Ubuntu 24.04 LTS machines. Any packages and prerequisits are targeted towards that.
Prerequisits
The runners require the following things to be installed:
- Docker CE, per https://docs.docker.com/engine/install/ubuntu/, including apt packages
docker-ce docker-ce-cli containerd.io docker-buildx-plugin - For Nvidia cards:
- per https://developer.nvidia.com/cuda-downloads?target_os=Linux, apt packages
nvidia-open cuda-toolkit-12-8 - per https://docs.nvidia.com/datacenter/cloud-native/container-toolkit/latest/install-guide.html, apt package
nvidia-container-toolkit
- per https://developer.nvidia.com/cuda-downloads?target_os=Linux, apt packages
- For further hardware accelerators: whatever is needed in terms of kernel drivers and to make them available inside a container
- Node & nvm:
- per https://github.com/nvm-sh/nvm?tab=readme-ov-file#installing-and-updating, install nvm
- use nvm to install node 20:
Terminal window nvm install 20- note the absolute path to the node executable, where you installed it
Unpacking the Downloader & registering the machine
Extract the downloader from its .tgz archive. The result should consist of a dist and node_modules folders. The dist-folder contains a few runnable scripts.
You can use dist/login.js to go through the steps of registering the machine with our servers.
In the Daisytuner Dashboard, go to any of your own repositories. The left sidebar will have a ‘Partitions’ entry. Under which you can create your own partition and then create new runners in your own partition (if the account has the priviliges to do so). When creating a new runner, the dashboard will show a long license key, which is given to the login script.
dist/login.js runner <token-from-dashboard>This registration is valid for the entire machine and will only need to be done once. Its persistent settings are stored in /var/lib/daisytuner.
The script will also confirm the validity of the registration token.
Installing as service (strongly recommended)
Commonly, the runner should be set up as a service that can auto-start and be managed by other tools. Systemd service facilities may also be required for all the restart and self-updating features.
It is recommended to put the Downloader into a folder such as /var/lib/daisytuner/runner-dl/v[version] and symlink a ‘current’ folder to it.
ln -s /var/lib/daisytuner/runner-dl/v[version] /var/lib/daisytuner/runner-dl/currentCreate a new “env” file next to it (/var/lib/daisytuner/runner-dl/env). This is standard file, which defines environment variables with which to run a service. As baseline it should contain
PATH=<path/to/node/executable>:<other/systemwide/paths>...DAISYTUNER_TMP=/tmp/daisytuner-runnerThe PATH must include the normal entries which for example a normal user gets as well as the node executable.
DAISYTUNER_TMP can point to any directory. It will contain the temporary data of all workflows. Under normal operation, this directory is cleaned up automatically after each workflow. Putting it under /tmp additionally ensures that its cleaned up on every reboot.
Now a service unit file can be created under /etc/systemd/system/daisytuner-dl.service:
[Unit]Description=Daisytuner Runner DownloaderAfter=network.targetStartLimitIntervalSec=60StartLimitBurst=30
[Service]Type=simpleRestart=on-failureUser=rootExecStart=/var/lib/daisytuner/runner-dl/current/dist/runner-dl.jsEnvironmentFile=/var/lib/daisytuner/runner-dl/envTimeoutStopSec=125minTimeoutStopFailureMode=killRestartSec=10

[Install]WantedBy=multi-user.target
Take care to update the paths, if you are diverging from the paths listed above.
The example unit file will auto-start the service at boot and will attempt to restart the service a reasonable amount of times if it fails, for example during temporary internet outages.
The service can be manually started etc. with the following command
sudo systemctl start daisytuner-dl.serviceLikewise, ‘status’ can show the current state of the service, ‘stop’ shuts it down. ‘restart’ is also available.
Once started, the downloader will contact our servers, select the appropriate runner for your hardware architecture, download and execute it (if not already available from a previous start). It can autonomously download newer runner versions whenever needed. The downloads will also be kept under DAISYTUNER_TMP.
Checking Status
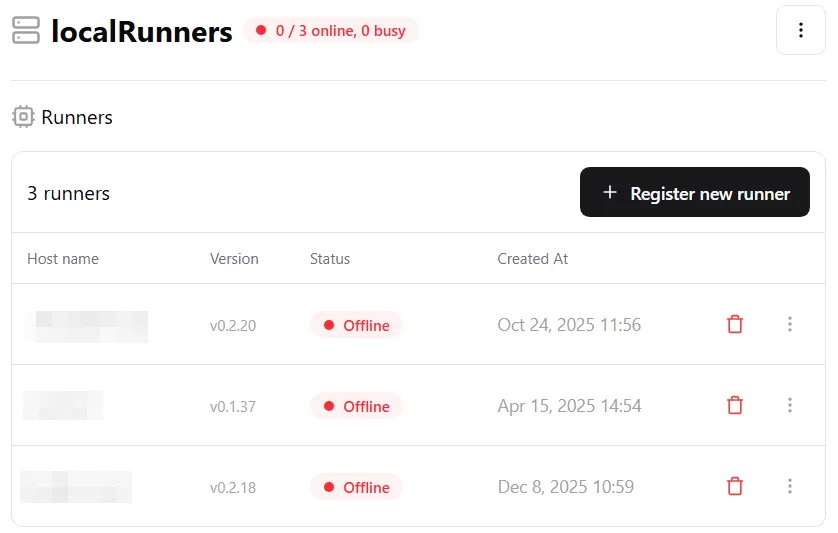
The list of runners in a partition in the Dashboard also shows the current version, status and last contact and can be used to confirm that a runner is available.
Operation & Self-Updating
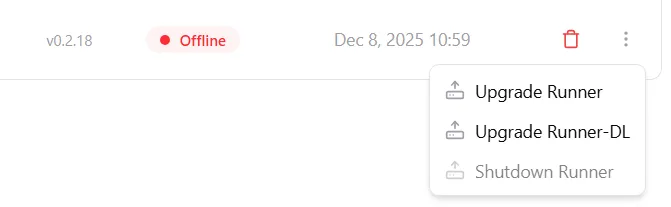
In case the Downloader itself ever needs updating - which should happen very rarely - we recommend extracting the new version into a new folder like above (the current version can still be running), updating the current symlink and then choosing the Update Runner-DL option in the dashboard. This ensures that any update or restart will be synchronized with any ongoing work (when the runner is idling or in between scheduled tasks).
Maintenance tasks can also be queued while the runner is offline.
While the above service file will also attempt to wait for any ongoing work to complete, it has a timeout of 125min, after which it will kill the runner regardless of whether it was still executing a job or not.
If the Downloader is run manually from the commandline, Ctrl+C will also request it to shutdown at its next stopping point without loosing data. A 2nd Ctrl+C press will cause it to forcibly terminate any ongoing work to quit immediately.
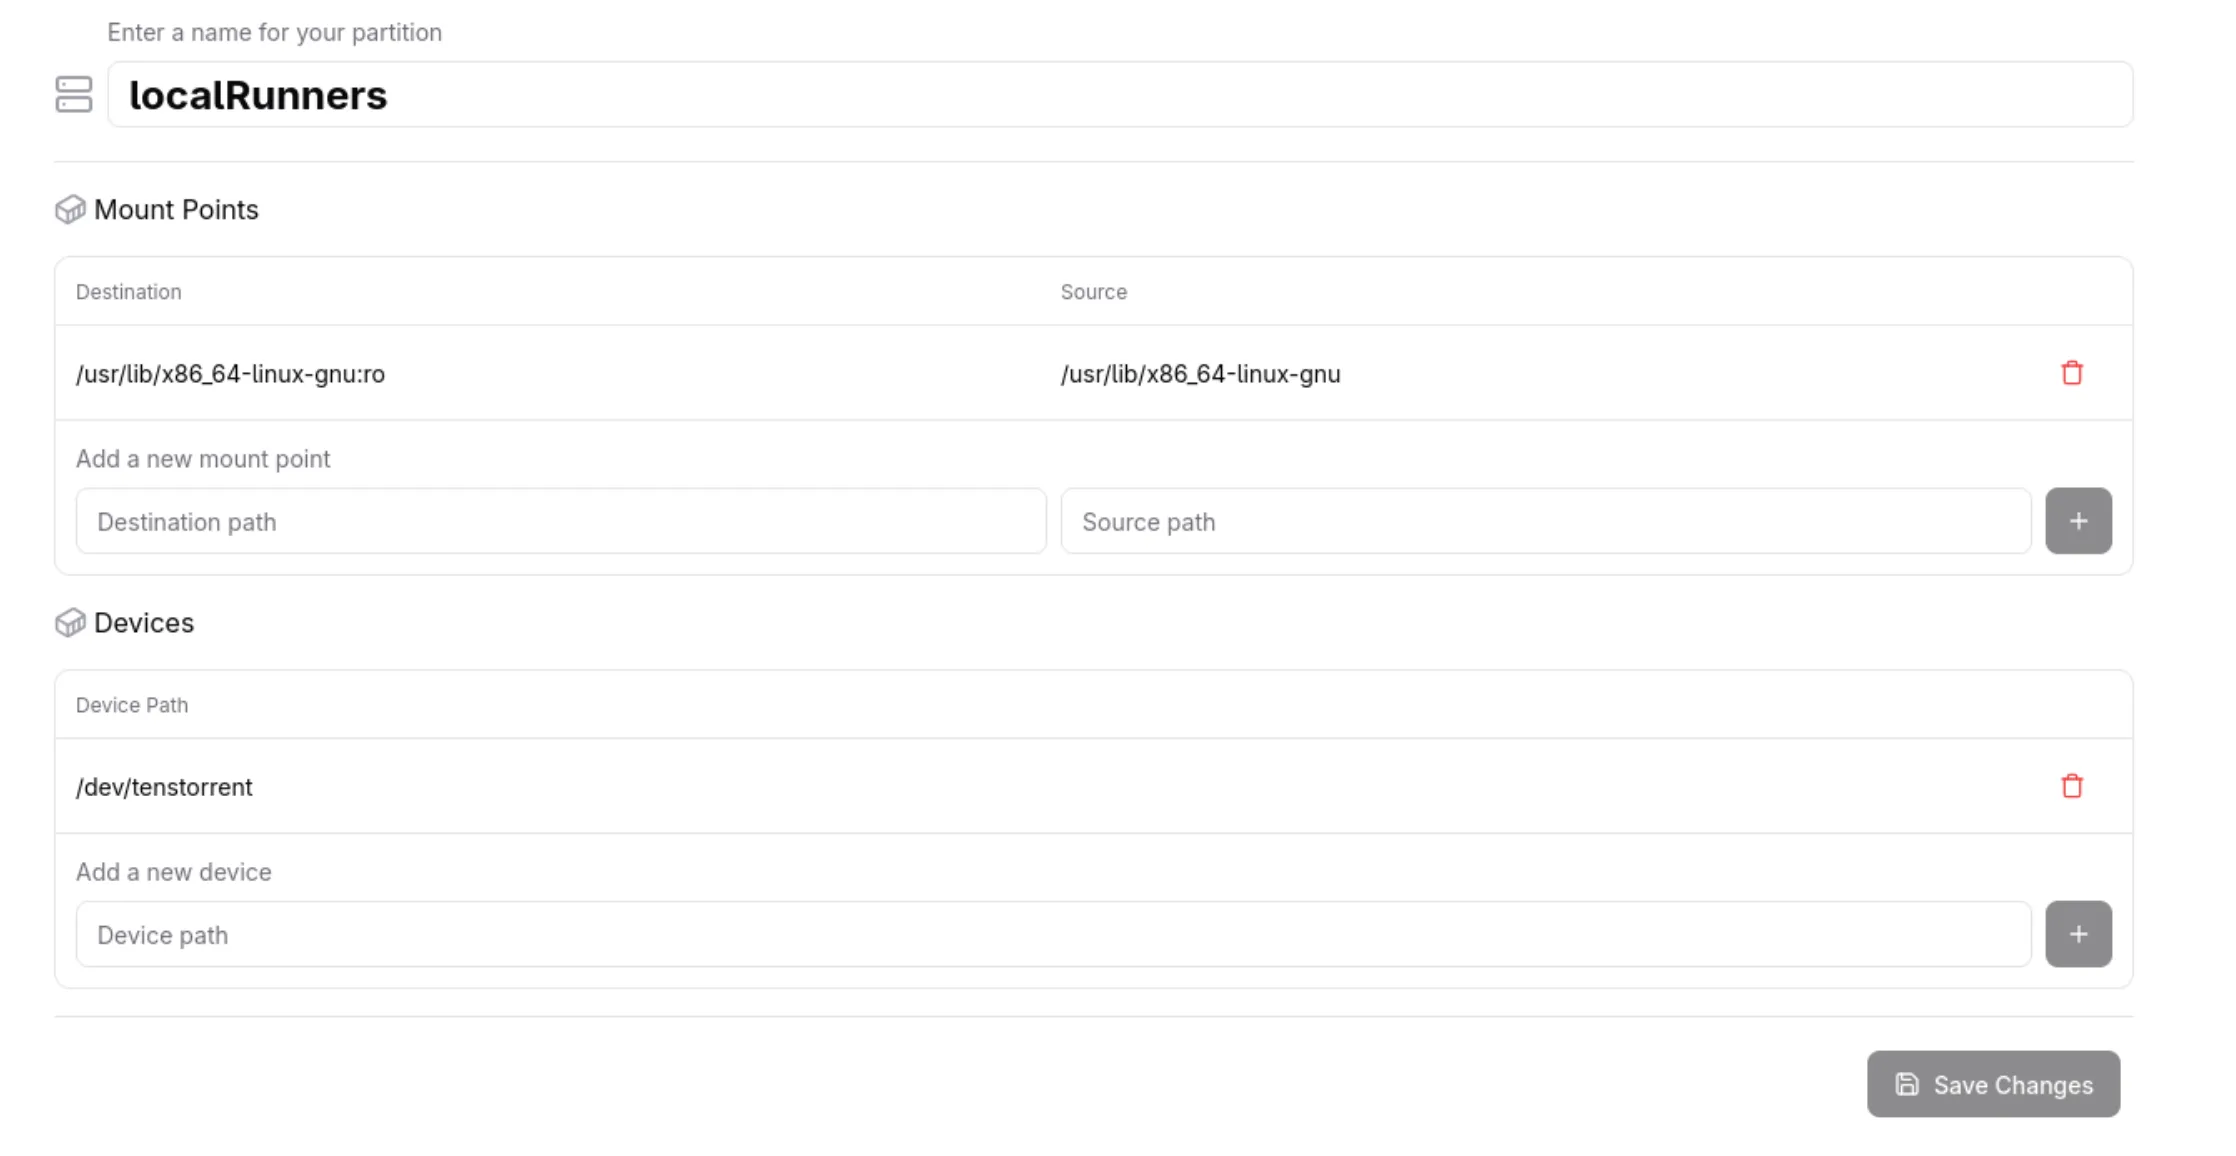
Partition Settings
The top-right menu button in the partition overview contains an “Edit” button, via which the partition settings can be edited. This includes the paths of devices and folders that will be mounted into each docker container.
Here is also, where the default docker container can be configured that will be used to run any workflow that does not define its own container image to run in.